Remaking Mario in Unreal Engine 5 (Part 2)
(This post follows on from this page: https://triplehitcombo.blogspot.com/2024/07/remaking-mario-in-unreal-engine-5-part-1.html)


The first task was to set up the variables I would need. These were related to where the character and flag are, references to the character and controller and some special variables for fireworks!


The next batch of code was simply moving both the character and the flag down the pole and before that, a short delay before playing a sound effect for when the character travels down the pole.

We are getting close to the end of this blueprint, I promise!
The next block is very simple, when the player is in position, play the explosion effect, then a quick sound effect and turn off the visibility of the character and particle effect. 

For the final code block, an emitter was called to represent the fireworks and this was set as a random location with the trigger volume. A Do N was used to spawn the emitter for however many times the special number was set as.

Next, a custom event was made for More Fireworks to be called at the end of the code block. A sound was spawned and the BP Points actor was called (This was created to hold the points value), then the Add Points function was called (This is why we created the reference to the player controller. and finally the More Fireworks event was called.


The next step was to play different audio files depending on what the player is doing and where the timer is currently at. Firstly, a re-triggerable delay was set to an event bound to the timer. A check for if the current time level was equal to zero was added and if it was true it would stop everything and the player would die. If it was false and the level timer had decremented to the time running out warning, then the main audio would pause and the time running out music would play. 
Last time we left off, we ended on the UI and ensuring that all variables to be displayed on screen worked as intended.
Checkpoints
First, I made a checkpoint system to give the player a place in the level to return to, to avoid frustration if they repeatedly die. The concept was to make the visual representation for the checkpoint, then a trigger volume.

In the event graph, I started to work on the blueprints.

The beginning of the code was a cast to the player and game mode BP. Then a setter for the spawn transform for the rotation of the checkpoint. This was set to a Do Once loop that connected to a timeline to display the animation of the flag changing when Mario enters the collision. Since the checkpoint can only be triggered once, a Do Once loop was the most useful choice.

After the timeline was set a lerp was added to adjust the rotation of the start and end rotation for the flag. Then a sound and emitter were used for extra flourish.
End of Level Flag
A checkpoint is useful of course but we still need to end the level and move on. I first set up the flag and the colliders.

The start of the code needed a reference for the player controller and then checks to make sure it is the correct character and disabling the input of the character when they hit the flagpole. Then a function for ending the level is called (Which will we examine shortly!)

The next step was to ensure that no matter where the player hits the flag pole the flag moves straight to where the player is before they slide down. This was done by essentially adding the attach point to the character and setting the vector points to the flags location.

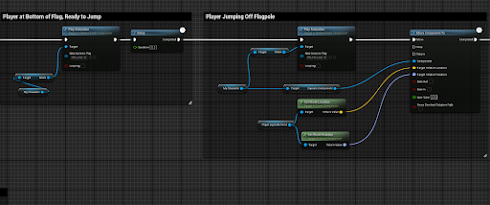
To make things simple, I added some code that said if the player jumped over the flagpole, they would simply teleport to the top of it.

The next step was to set the player position on the flag pole then change the gravity settings to move the player down and stop at the bottom. I used the run forward animation from the starter content and picked a frame from it to serve as an 'animation'.


The next step in the code was to put the character in the jump animation at the bottom of the flag and then add a falling animation for when the player jumps off the flagpole and then move the player to the point in the final trigger volume.


Remember the special fireworks variables? Now they come into play! Like in the original games, when the player has a certain number as the final digit in the level time on completion, fireworks and extra points are awarded! This code block grabs the level time from the controller and chooses the right most digit and checks to see if it is the same as the firework special number.

For the final code block, an emitter was called to represent the fireworks and this was set as a random location with the trigger volume. A Do N was used to spawn the emitter for however many times the special number was set as.

Next, a custom event was made for More Fireworks to be called at the end of the code block. A sound was spawned and the BP Points actor was called (This was created to hold the points value), then the Add Points function was called (This is why we created the reference to the player controller. and finally the More Fireworks event was called.

Level Settings
Now would be a good time for another lengthy code block! Since we just talked about the End of Level Flag and that mysterious function for Level Complete...well, this is where it hides.
I created this as a blueprint so it can be placed in any level and different elements of the level could be changed quickly. The components added were all audio components. A reference to the player controller was called so I could use all the variables within. Parameters regarding level times were set to be instance editable and a reference to the End of Level Flag was added, as well as a Level to Go To.

After Begin Play, an event for Player Respawn was made and that was connected to a sequence node. The first thing the sequence needed to do was to check if the player was alive and if so, reset the settings. Next a reference to the player was created and the time for the level was set (instance editable). Finally, the background audio for the level is set.


The next portions of the code were simple. First, stop all music if the player has died and this is where the Level Complete function is called (as far as the sequence node flows at least). 


Once the Level Complete check is done, the game then decrements the time and add that number to the points and plays a sound as it does so. The faster the player completes the level, the more points they get.

And finally, the data held for lives, points and coins are all stored and the Level to Go To variable is called to transport the player to the next level and keep all of the values for the next level.

While we haven't covered a huge amount in this post, we have broken down a couple of big pieces of code and that's enough work on the brain for now! We'll break some more down in another post!


Comments
Post a Comment