Remaking Mario in Unreal Engine 5 (Part 1)
For this project, I aim to remake Mario (or at least as best as I can) in UE5. The project makes sense as, while it is simple, there are a lot of core concepts that are valuable for any newbie game dev. Here is the first part of what I've done so far, which is a lot of set up. Stay tuned for Part 2 soon!
The first port of call was to get the camera in position to act as a side scroller.
Here I set parameters, to allow for customization of where the camera goes in real time. This allowed me to find a sweet spot that looked good for the perspective I wanted.
(This ended up looking similar to this)
The next step was to set snap layers. This allowed me to set layers for placing assets for the foreground, main play layer and background. This is important because all of the interactable objects would only be in the middle of the play area and without the snap layers, if they were incorrectly placed, the player may not be able to interact with them.
(The snap layer settings looked like this)
Then I created a platform for 'Mario' to jump on. They were instance editable with a movable widget allowing me to change the location and speed of every one I placed.
Adjustments were made to the jump mechanic and the controls for moving up and down were disabled, as well as pressing Down allowed the player to drop through a platform, to provide an authentic experience and ensure 'Mario' only goes where he is supposed to.
I then turned my attention to a mushroom that launches the player in the air. The collision system was the same as the platform then the main script was written.
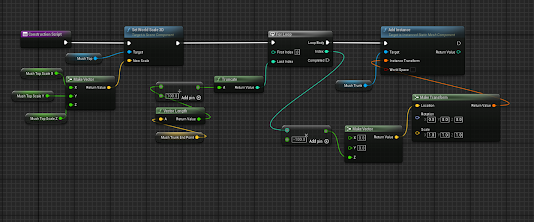
A construction script was made to allow for instance editable changes to the size of the top of the mushroom and for the trunk of the mushroom, a loop was created to add extra parts of the trunk in the editor as desired.
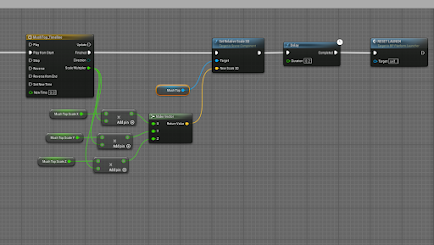
In the main script, the launch velocity value was set (This was also instance editable) and a break hit was created to spawn an emitter particle when the player hit the top of the mushroom. Then a timeline was created to change the scale of the mushroom, and the RESET LAUNCH function was called to allow the player to jump on the mushroom again.
Next up was the classic fire ball trap. First up in the construction script, I had to make sure the fireballs were instance editable for future placement (not pictured below is the code for allowing changes to rotation of the trap).
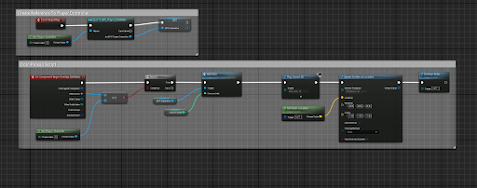
To actually apply this damage, I went into the ThirdPersonCharatcer blueprint and created a script to modify when the player is hit. This was done via a sequence and it checked if the player had been hit and changed the material if the hit point was above zero and destroyed the player pawn if it hit zero, then in the sequence it played sound effects for when the player was hit and eventually, when they were dead.
In game this looks like this:
Next up was the coin system. What Mario game is complete without those?!
This was a really simple system, pick up the coin by passing the collider, call an Add Coin function to increment the coins the player has, play a sound and a particle and then remove the coin from play. The coins are instance editable so they can be changed as I desire. A reference to the player character was created to update the values as well.
In game it looks and sounds a little like this:
Finally, for Part 1, is the UI. First, I created the UI widget and placed everything where I needed it to be.
Then in the event graph I created a reference to the player controller to get the variables i needed and I bound them to the text blocks I required. For example, in the image below you can see the Lives is bound to the Lives variable I had previously set. This would allow each variable to update in real time.


Comments
Post a Comment